A pre-settlement inspection is crucial for verifying a property’s condition. This checklist ensures buyers identify issues before finalizing their purchase, promoting a smooth transaction.
1.1 Importance of Pre-Settlement Inspection
A pre-settlement inspection is a critical step in the home-buying process, ensuring the property is in the agreed-upon condition before finalizing the purchase. It allows buyers to identify any potential issues, such as damaged fixtures or malfunctioning appliances, which could impact the property’s value or require costly repairs. Conducting this inspection provides peace of mind, as it verifies that the property meets expectations and safeguards against unexpected problems post-settlement. Additionally, it offers an opportunity to negotiate repairs or adjustments with the seller, protecting the buyer’s investment. A thorough pre-settlement inspection is essential for a smooth and stress-free settlement process.

1.2 Brief Overview of the Checklist
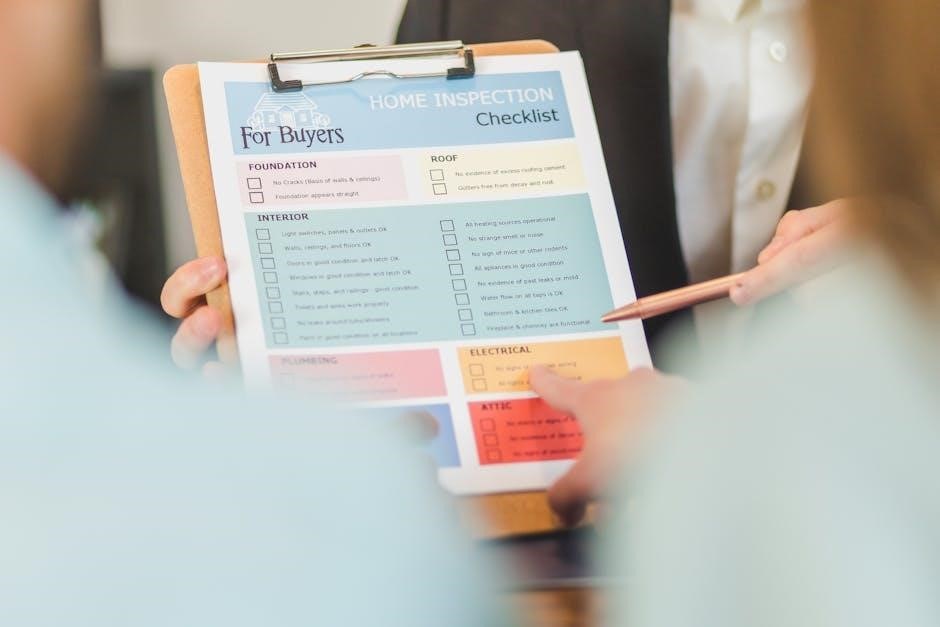
The pre-settlement inspection checklist is a comprehensive guide designed to help buyers systematically evaluate a property’s condition before finalizing the purchase. It covers key areas such as the exterior, interior, fixtures, appliances, and services. The checklist includes specific items like door locks, window functionality, and laundry and kitchen appliance condition. It also emphasizes documenting findings and addressing potential issues with the seller. By following the checklist, buyers can ensure they thoroughly inspect the property, identify any defects, and negotiate necessary repairs or adjustments. This tool is essential for ensuring a smooth and confident settlement process, protecting the buyer’s investment.

Purpose of a Pre-Settlement Inspection Checklist
The checklist ensures the property is in good condition, identifies potential issues, and facilitates smooth transactions by providing a clear framework for evaluating and addressing defects.
2.1 Ensuring Property Condition
A pre-settlement inspection checklist helps verify that the property is in the agreed-upon condition. It ensures all fixtures, appliances, and systems function properly, reducing post-settlement disputes. Buyers can check doors, locks, and keys, ensuring they work as intended. The checklist also covers windows, doorbell functionality, and laundry appliances, like taps and drains. By systematically evaluating each component, buyers can confirm that the property meets their expectations. This step is crucial for identifying any defects or damage that may have occurred since the sale agreement was signed, ensuring a smooth transition and peace of mind for the buyer.
2.2 Identifying Potential Issues

A pre-settlement inspection checklist is essential for identifying potential issues that may have arisen since the sale agreement. It allows buyers to thoroughly examine the property, ensuring no new damage or defects exist. By checking doors, locks, and keys, buyers can verify functionality and security. Windows and doorbell functionality are also evaluated to ensure everything works as intended. Laundry and kitchen appliances, such as taps and drains, are inspected to confirm proper operation. This process helps uncover any hidden problems, enabling buyers to address them with the seller before settlement. Identifying these issues early ensures a smoother transition and avoids post-settlement surprises.

Key Components of a Pre-Settlement Inspection Checklist
A pre-settlement inspection checklist includes thorough checks of exterior and interior areas, focusing on fixtures, appliances, and essential systems to ensure the property is in good, functioning condition.

3.1 Exterior Inspection
The exterior inspection focuses on evaluating the property’s outer structures and systems. Check the condition of walls, roofs, gutters, and downspouts for damage or wear. Inspect fences, gates, and outdoor fixtures to ensure they are secure and functional. Verify that all exterior doors and windows are in good condition, with proper sealing and no signs of rot or damage. Look for any signs of pests, mold, or structural issues. Ensure that the driveway, paths, and landscaping are well-maintained. Check the functionality of outdoor taps, irrigation systems, and electrical outlets if present. Document any defects or needed repairs for further action.
3.2 Interior Inspection
The interior inspection involves examining the condition of walls, ceilings, and floors for cracks, water damage, or peeling paint. Check all doors and windows to ensure they open and close smoothly. Inspect lighting fixtures, switches, and electrical outlets to confirm they are functioning properly. Test all plumbing fixtures, including taps and showers, for leaks or water pressure issues. Examine kitchen and bathroom areas, including cabinetry and countertops, for damage or wear. Check for proper ventilation and look for signs of pests or mold. Ensure all interior systems, such as heating and cooling, are operational. Document any damage or needed repairs for further action.
3.3 Fixtures, Appliances, and Services
During the inspection, examine all fixtures, appliances, and services to ensure they are in working condition. Check lighting fixtures, ceiling fans, and plumbing systems for leaks or damage. Test kitchen appliances, including ovens, stovetops, and dishwashers, to confirm functionality. Inspect laundry facilities, such as washing machines and dryers, if included in the sale. Verify that all electrical outlets, switches, and circuit breakers are operational. Ensure gas connections, water heaters, and air conditioning systems are functioning properly. Document any defects or malfunctions. This step ensures that all included items are in good working order before settlement, avoiding post-purchase surprises.

What to Check During the Inspection
Check doors, locks, and windows for proper function. Test all appliances, plumbing, and electrical systems. Ensure everything is in working condition before settlement.
4.1 Doors, Locks, and Keys
Inspect all doors to ensure they open and close smoothly. Check locks for proper functioning and test all keys to confirm they work correctly. Verify the doorbell is operational. Ensure no doors are damaged or misaligned. Examine locks for signs of wear or tampering. Test sliding doors and screens for smooth operation. Confirm all keys provided match the corresponding locks. Check for any missing or duplicate keys. Ensure all doors are secure and lock properly. Note any issues with door frames or hinges. This step ensures all entry points are safe and functional before settlement. Document any defects for further action.
4.2 Windows and Doorbell Functionality
Examine all windows to ensure they open, close, and lock securely. Check for any cracks, broken panes, or faulty hinges. Verify window screens are intact and properly fitted. Test the doorbell to confirm it functions correctly. Ensure all windows are free from damage or wear. Check for proper sealing to prevent drafts or water intrusion. Inspect window locks for operational efficiency. Ensure the doorbell is loud enough and responsive. Note any issues with window frames or sills. This step ensures all windows and entry features are in good condition. Document any defects for potential repairs or adjustments before settlement.
4.3 Laundry and Kitchen Appliances
Inspect the laundry area, ensuring taps function properly and drains are clear. Check if the washing machine and dryer, if included, are in working condition. In the kitchen, test all appliances like dishwashers, ovens, and microwaves. Verify that each appliance is operational and free from damage. Check for any signs of leaks or malfunctions. Ensure all knobs, buttons, and controls are functioning. Test the dishwasher cycle and oven heating. Confirm that all appliances are clean and ready for use. Document any issues or needed repairs. This step ensures all laundry and kitchen appliances are in good working order before settlement.

Post-Inspection Steps
Document all findings, noting repairs or adjustments needed. Share the report with the seller or agent to negotiate resolutions. Ensure all agreed-upon fixes are completed before settlement.
5.1 Documenting Findings
Documenting findings during a pre-settlement inspection is essential for creating a clear record of the property’s condition. Use the checklist to note any damages, malfunctions, or issues. Take photos or videos as visual evidence. Organize the findings in a detailed report, highlighting areas needing repair or adjustment. Share this documentation with the seller or agent to address concerns. Ensure the report is thorough, as it serves as a reference for negotiations and future disputes. Comparing the findings with the original property condition report can also help identify new issues that may have arisen. A well-documented report protects both buyers and sellers, ensuring accountability and transparency.
5.2 Negotiating Repairs or Adjustments
Negotiating repairs or adjustments is a critical step after documenting findings. Review the pre-settlement inspection checklist with the seller or agent to address identified issues. Prioritize repairs based on severity and urgency. Discuss possible solutions, such as the seller completing repairs, offering a credit, or reducing the purchase price. Ensure all agreements are documented in writing to avoid disputes. If major issues arise, consider seeking professional assistance to mediate negotiations. A successful negotiation ensures a fair resolution, benefiting both parties and facilitating a smooth settlement process. Clear communication and a detailed inspection report are key to achieving a mutually satisfactory outcome.
A pre-settlement inspection checklist is invaluable for ensuring a smooth property transfer. It verifies the property’s condition and helps address issues promptly. Download the PDF for a seamless experience.

6.1 Final Tips for a Smooth Settlement
Allow at least one hour for the inspection to thoroughly check all areas. Use the pre-settlement inspection checklist to ensure no detail is overlooked. Measure furniture and large appliances beforehand to confirm they fit. Test all fixtures, appliances, and systems to ensure functionality. Document any issues with photos or notes for clarity. Provide a copy of your findings to the seller or agent for necessary repairs. Remember, this process protects your investment and ensures a hassle-free settlement. Download the pre-settlement inspection checklist PDF to stay organized and confident throughout the process.
6.2 Downloading the Pre-Settlement Inspection Checklist PDF
Downloading the pre-settlement inspection checklist PDF is a straightforward process. Visit trusted websites like legal or real estate platforms to access free templates. Ensure the checklist is comprehensive, covering exterior, interior, and essential systems. Print or save the PDF for easy use during inspections. This document serves as a valuable guide to ensure no details are missed. By using the checklist, buyers can verify the property’s condition and negotiate repairs confidently. Make sure to review and customize the PDF according to your specific needs. A well-prepared checklist guarantees a smooth and stress-free settlement process.